Pages

Sep 19, 2012

Stormwall Conversion Update

The beast is taking shape. I've managed to get him all magnetized in a state that i can field him whole (goodbye to just legs on a base)!
I started by magnetizing his torso. Because this was an important joint to keep flush, this required some finagling. I drilled two holes in the torso piece first. These holes were determined after I decided the angle of his pose. this explains why they are slightly askew.

After that, I filled in the waist piece with putty. the next part is the best way to ensure that magnets are flush with any model. simply connect them! I placed 2 magnets over the torso magnets and pressed th etorso piece against the puttied waist piece. this results in 2 perfectly positioned and flushed up holes for the waist magnets to sit. Then after the putty was dry, I applied glue (putty or greenstuff alone may not always reliably hold magnets in place).
Something was missing, however. As you can see, there was too much space on the base. So i began to brainstorm and then I decided to throw in the anchor...what could POSSIBLY be more badass than a hulking metal monstrosity swinging around an old ship anchor!?! Trick question. The answer is clearly, "nothing."

I started by drawing an anchor on a post it note, getting a relative size down. then found an old lid with the right angled arc for the anchor bottom. I cut a piece from this and formed putty around it, freehand, until it vaguely resembled the slight taper of an anchor.

It needed a post, so I cut the inside inkwell of an old pen and connected it to the newly fashioned anchor. I cut little triangles out of plasticard to act as the anchor blades and fashioned them in place. all that was left were the support rods on the side which i threw together with toothpicks and a dab of putty on the end.
The end result looks pretty good for having been thrown together with scraps. Next was altering the hand. I connected the anchor to the hand using my girlfriends old necklace chain. I used his already "fist" hand and altered it to appear as though clenched over wrapped chains. this way the anchor is implied to be an epic weapon.

To add a sense of dynamic awesomeness, I decided to sink the anchor into the earth a bit as if Dr. Stormwallis had just hurled it ashore. to do this, I cut a small chunk out of the base for one of the anchor blades to occupy and formed up a bit of "earth" that the anchor displaced upon impact. the result is exactly the kind of dynamic space filler i had envisioned for the base and adds a bit of character and yet more nautical theming to my creation.


I magnetized the anchor to the base as well as the hand to the wrist, so that the entire contraption can be removed for storage OR as a failsafe if the chain accidentally catches on something.
The close-to-end result is something I am very proud of. Behold the mighty Stormwallis!


Sep 2, 2012

The Base-ics

I wanted Stormy to be hulking out of the water onto some sort of bank. This base is going to take a lot of time and consideration if i want it to look as awesome as I've got it pictured in my head. the concept is simple...
Pretty much this but more epic and awesome. if that's possible.
So far, I've got this:


Stay tuned for updates... they are sure to be frequent as I've basically done all my Stormwall converting within the past two weeks, driven by my excitement for the project! Thanks for checking it out :)

A Knee-t Little Trick

One thing plaguing all robot like models since the dawn of time... LACK OF BENDY KNEES! seriously... check out this Khador Kodiak jack:
He's got squatty knees. WOW! SO DYNAMIC!
Or this Tau Battlesuit:
Man! Hope he doesn't have to tie his shoes!

 Without the ability to separately pose the legs, these models lose the war on dynamic posing (a war that, to me, is more important than the battle on the actual tabletop). You need cool looking models, people! otherwise, we would just be playing our wargames with pieces of paper and crayons.

So  my stormwall needed bendy knees. This meant an enormous undertaking, having to remove both halves of the leg without compromising the leg itself. I decided to cut along the area shown below:
The fruits of my hour or so of delicate xacto sawing...
Step 2 was to shave down all the crap still left in the joint.
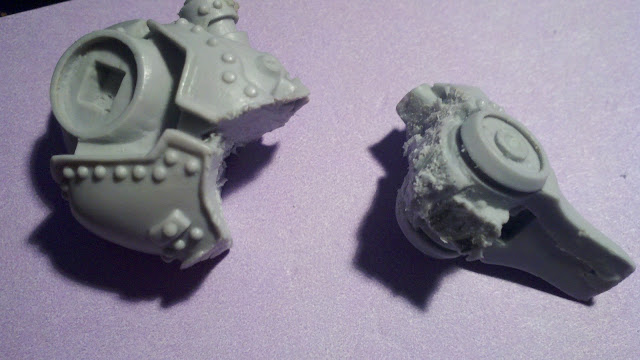
once the joint was relatively smoothed out, It was time to ensure that the piston "achilles tendon" would align properly with my leg adjustments. This required hacking off the bit altogether and shortening the piston as it would be if the heel was retracted and leg was bent.
The end result represents and entirely retracted piston, allowing enough headroom to fit the bent thigh section in. The next step was to grind out the square holes in the hip connection to allow for free rotation while I found the proper angle to prop the leg up. This was then glued in place with the other leg resulting in the torso piece as shown
Dr. Stormwallis was now clearly ready for a base on which to perch himself!

Would You Give Me a Hand?

I'll start with exhibit A:
WTF is this? this isn't a fist, its not a relaxed hand, its not a pointy finger, its not a clutching claw of doom... this isn't even a natural hand pose for anything less than that of a hormonal teenage boys embarrassing past time. SURELY this is no hand pose for such a monstrous yet majestic iron death machine. So, I decided to chop off his fingers and perform reconstructive surgery.

Being such a tall object on the battlefield, he would serve as a lookout for most ground troops, warning of dangers ahead. so naturally, he should be pointing towards something. I started hacking away his right hand at the knuckles to better pose each individual finger.

The image below depicts an unbiased comparison between the factory fist and my work in progress hand...


I then added the all important pointy-finger finger


All that was left was a little green stuff (or grey stuff in this case) to hide my gaps. the end result made me quite happy and im confident that once primed, the grey stuff sections will be much less noticeable.


Its got an almost "sistine chapel" feel to it. Clearly what I was going for...

For the left hand, I decided to alter the fist a bit, to make it a bit more punchy. If the Stormwall were to punch anything with those goofy excuses for fists, it would break every gear in its hand. Not enough clench! so I altered this. A simple procedure that yielded and over all more believable fist.


Stormwall Conversion

So i recently managed to get my hands on the new Cygnar Stormwall!
This dude is pretty large sitting at around 6" tall. HOWEVER, I particularly find this pose to be (as most privateer things) incredibly boring and lacking any sort of dynamic life. Thus began the quest to give this model the epicness it so rightly deserves!!!!!

As you already know, water effects play an important role in my army. I've decided to make this colossal brute rising from beneath the tide! In addition, his "lightning pods" will be modeled as buoys floating and bobbing on the waves. This will most likely be my largest undertaking so far and i'm super excited to mahe the single most unique stormwall on the interwebz. (seriously... how has no one tried creatively altering this beautiful model yet?) Stay tuned!

Jun 8, 2012

Minutes Later...

SO! I managed to finally get the Minuteman pretty much completed. Behold! My Minuteman :)


He's got a few barnacles growing. All-in-all I think he came out decent. not my favorite, but he's done!

Apr 25, 2012

Give Me a Minute, Man!

So I snagged the new Minuteman model, and I wanted to give him a unique base. He has a special jump pack rule and I wanted to model him using his jetpack as a pair of water jets! I messed around with some stuff and it actually managed to work out pretty well. Behold!

This is a preliminary shot, before I did the drybrushing. Going through with multiple shades from grey to white, i managed to get a "frosted" look as if the waves were turbid and splashing back. This resulted in...
The jack, itself, I chose to pose in a more dynamic way than they intended. I lifted his leg up a bit to simulate him taking to the sky. I also posed one of his arms as if he is firing while jetpacking backwards.

More updates as I get this bad boy painted up! So far, he's primed and ready for a fresh coat!

Mar 30, 2012

The Grand Staircase

I wanted to add one of the signature landmarks of the Titanic, the Grand Staircase. To do this, I had to add an in between deck with more plasticard. I then dremeled out the hole where the staircase would have been.

While its wooden structure no longer exists, the strangely shaped hole that it occupied still remains. Peering into the empty hole left by the skylight dome, one can see the remains of the Grand Staircase as well as the supporting columns on the deck surrounding it.


Boat Deck

The Boat Deck is named as such for its role in housing the life boats. This level marks the first deck of the ship which I did not have to manually craft. Some work was still needed, however, to convert the pristine decking to wreckage condition. I had to ensure proper sloping and position of the Boat Deck crack. The ship split just before the 3rd funnel, as depicted by the model.


The Aft

Towards the aft of the bow section, the deck levels have collapsed forming a layer cake of rubble, cable, girders, and rust. Due in part to both the initial snapping of the backbone at the surface and the final impact with the ocean floor, the deck collapse remains one of Titanic's defining features. The first step of creating Titanic's aft section was creating the boilers visible in the wreckage. I used cut sections of a mechanical pencil, perfectly round and the proper size to fit the adequate scale. In reality, the boilers would be 4 times the height of the average man. These boilers were used to power the largest single steam engines ever built, nearly 2 stories in height, each.

Above the boiler level sat the rest of the decks. I decided, again, to make these out of plasticard. I twisted and warped the ends with a pair of clippers and some help from a lighter. This helped simulate the twisted nature of the steel decking as it was ripped from its other half. 
With cabling and debris added, the result begins to look more like the actual wreckage.